


| jancsi33 • PM |
Sep 22, 2009 2:14 PM
|
|
Jancsi.:LLS:.
Posts: 217 |
So, here is the so called mappers' corner and I want to be a mapper.
First i'd like to learn some basic things: -Jumppads -Teleporters (a "beginner" mapper taught me about them and I made and linked them but I forgot the "linkage"  ) )-Weapon spawns/ammo/pickups/Weapon lockers -Skyboxes (also the same "beginner" mapper taught me about them but I want to learn more about them  ) )-Well I know this is not a basic thing but I don't know what is a "zone portal"... Oh! and also there is the "sky" (or is it also some kind of skybox stuff? ah well I dunno) -Terrain. I wont make terrain in my map but it doesn't hurt if I know how to make.  EDIT: -Triggers and moving objects -How can I make a trapezoid. I mean... um... I'll show a picture when we get to this Okay, that is all for now, I plan my first map as a DM map, and when I learn the things above then I'll start thinking about the map  because I didn't imagine the map itself I just planned that I'll make a DM map. because I didn't imagine the map itself I just planned that I'll make a DM map.
Last edited by: jancsi33 Sep 25, 2009 1:57 PM
|
| crusha_k_rool • PM |
Sep 22, 2009 3:57 PM
|
|
[GSPB]Crusha
Posts: 926 |
I'll answer those questions one after another, not all at once.
I take this from the UDN, to have the pictures: This is how it looks like in the end, only BSP in wireframe is shown. 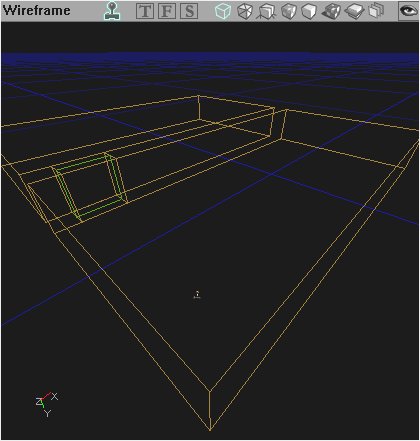 The green thing between the brushes is the zone-portal that we gonna add. It's created using a builder-brush in sheet-shape and by clicking then on "Add Special Brush". Choose zone-portal then. 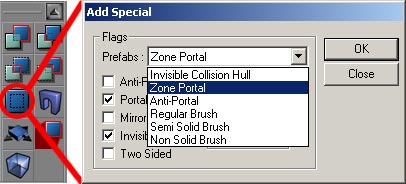 This will create the zone-portal with the texture you chose in the texture-browser. You can load the package wm_textures.utx to find a fancy green texture there that says "zone-portal". You can use that or any else, I prefer this one. The zone-portal (the texture) is flagged as invisible, you can see it's flags by right clicking on it's texture and select the top entry (F5). This means it's invisible while playing. You can test that by activating the realtime-view in the viewport (the joystick on the left): 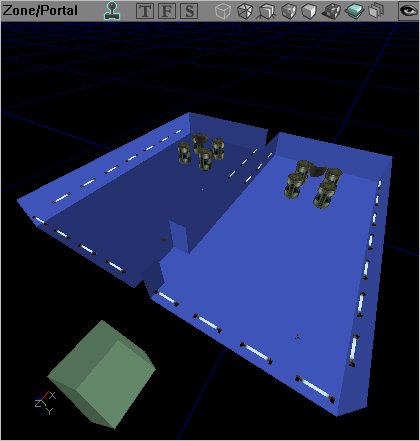 In this image is the BSP-cut-view activated. It shows each zone in it's own colour. You can have more than 50 different zones in a map btw. And this is how it looks after you added the portal and rebuilded the geometry: 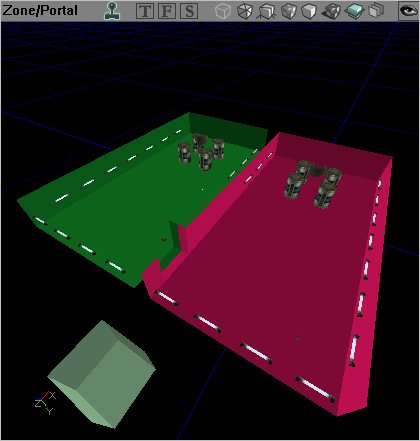 Now, when you look at the long wall next to the door, then the whole zone behind it will be occluded, if not a single zone-portal of the zone you would be looking in is inside your view any longer. In this picture would the zone on the top not be rendered at all: 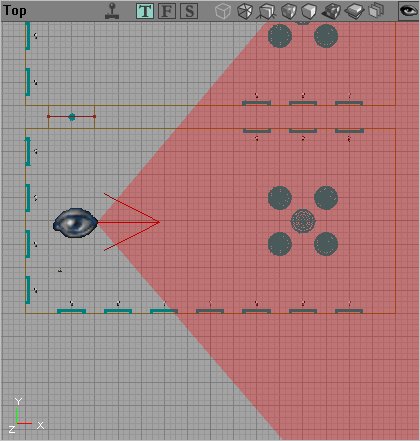 Note, that if your zone-portal is still visible inside the wall you'd be looking in, then the zone will not be occluded:  Size matter: left is bad, right is good. Zones can do even more things, but for today it's enough. 
Last edited by: crusha_k_rool Sep 22, 2009 3:58 PM
|
| jancsi33 • PM |
Sep 22, 2009 4:11 PM
|
|
Jancsi.:LLS:.
Posts: 217 |
Oclluded? So to prevent low fps?
|
| crusha_k_rool • PM |
Sep 22, 2009 4:49 PM
|
|
[GSPB]Crusha
Posts: 926 |
jancsi33 wrote: Yeah, but if you ask already, then I can tell you also about one of the most unique abilities of a zone. You can add a ZoneInfo (one per zone) and adjust special things that affect the zone and the player in the zone. So to add a ZoneInfo, open the Actor Class Browser (ACB)  then go to 'Info' -> 'ZoneInfo*' and click it (click the ZoneInfo, nothing from the branch of it). then go to 'Info' -> 'ZoneInfo*' and click it (click the ZoneInfo, nothing from the branch of it).The * in the ACB means, that this is a placable object. Then right-click in the map where you want it to be. In the context-menu is always one entry that says "Add *the thing that you selected in one of the browsers* here". So click "Add ZoneInfo here". Now go into it's properties (right-click and the top entry or F4). Some properties are common to all or almost all actors, like "Advanced", "Collision", "Display", "Events", "Object" and "Sound". The other things are actor-specific, so take a look at them. You can find a description for almost every entry here: http://wiki.beyondunreal.com/Legacy:ZoneInfo I'll pick only the most important: ZoneInfo-category: bDistanceFog - obvious. bTerrainZone - needed when we're going to create terrain, don't care about for now. KillZ - When a player falls under this line, he dies. You don't need to change that, just build high enough. We'll come back to that in a few lines. Location-name - this could be set to give your zone a name that is shown when the players use the teamchat. So if you use the hotkey for "I am in position (location)", then location is the name that you entered here. However, use a volume for this; it would override the ZoneInfo-name anyways because it's "stronger".
|
| crusha_k_rool • PM |
Sep 22, 2009 4:50 PM
|
|
[GSPB]Crusha
Posts: 926 |
ZoneLight-category:
You can set different light-ambients here or bright things up (but that looks unrealistic on StaticMeshes, so leave it alone if you don't want some plastic-look). DistanceFogEnd - This is in UnrealUnits the distance behind which geometry is completely occluded and not rendered anymore. This is the value when you turn distance-fog in your settings to the maximum value, meaning the value for high-end machines. DistanceFogEndMin - the same, just for the most left value in the settings. Make this smaller than the maximum, but not with a too big gap or it will handicap players on weak computers at the distance-fight. You can measure distances in the editor by holding Shift and middle-click on a point in a 2D-viewport and then drag your mouse to where you want. DistanceFogColour - choose the colour by RGB-value or use the "Pick"-tool at the right of the entry and click on something in the map to get it's colour. You should take the same colour as you skybox-background. DistanceFogStart - how far until the fog starts in UU. Everything before this value is clear and the fog will get more depth until it reaches the max or min fogdistance, depending on your settings. ZoneVisibility-category: bLonelyZone - the zone is only rendered when you are inside. Use this only, if the only way to enter this zone is by using a teleport. I did that for the redeemer-room in StorageFacility for example. ZoneSound-category: One thing that I almost never see in any custom map, is this. It is used to enable special sound-effects for people with EAX 3.0-compatible soundcards. So even if you don't own such a card, you can still set this value just by the given names to find a good sound-effect for the users with such hardware. Take a look: http://img16.imageshack.us/img16/8631/zonesound.jpg Select an entry from that list with a name that seems like it could be the thing that you just built and then click on the "New" to add it. Then leave it the way it is. These effects influence how far a sound travels through the zone, how it changes while travelling and when being emitted and so on, so it gives you a much more realistic experience. But that is seriously everything for today. 
|
| jancsi33 • PM |
Sep 22, 2009 5:22 PM
|
|
Jancsi.:LLS:.
Posts: 217 |
Okay, thanks, and sorry for wasting your time (you will hear this much)
|
| jancsi33 • PM |
Sep 24, 2009 10:10 AM
|
|
Jancsi.:LLS:.
Posts: 217 |
By the way how come that I can hear birds for example in halo-bloodgulch, but I can't hear things I put on the zoneinfo?
Also, let's move on to the jumppads ^^. |
| crusha_k_rool • PM |
Sep 24, 2009 11:14 AM
|
|
[GSPB]Crusha
Posts: 926 |
I can't explain much right now, because I this is a stressful week, but jumppads are pretty simple.
Go into the ACB -> NavigationPoint -> Jumppad -> UTJumppad* and select it. Add in into your map with a right-click "Add UTJumppad here"  You need another NavigationPoint-actor as a destination. That can be everything from that class, for example a normal PathNode, a JumpSpot, another Jumppad (you could chain them), a PickupBase, a RoadPathNode, etc. Now go into the properties of your destination-object. I take usually a PathNode (those can be placed at any time without selecting them in the ACB, they are "stock" like lights and playerstarts). Go into the "Object"-section. Each Actor has this section and each actor has a unique name in your map, that can't be changed by hand in the editor. For example this could be "PathNode15". Remember that and go into the properties of the jumppad. Go into the section "NavigationPoint" -> "ForcedPaths". There you write the name of your destination-object, here it would be PathNode15 (you can write it without capital-letters, if the name matches one of the objects in your map, then it will turn automatically into the capital-letter-form. If you rebuild your paths now, then you should see a yellow line indicating that there is a Forced Path from your jumppad to the destination. When you click on your jumppad now, then you will see a purple curve indicating how the player would jump with it. You can scale that line with the "JumpZModifier" in the "Jumppad"-section. If you want your jumppad to emit a sound when it's used, then you have to enter it into the "JumpSound"-line. Go into the Sound Browser and open the package "wm_sounds.uax". Select the sound "wm_BootJmp". Go into the JumpSound-line in the properties of the jumppad and click on "Use" that will copy the name of your current selection into the field. You will now get the default jumppad-sound, but you can of course use another one, if you like. Other properties in the "NavigationPoint"-section: bAlwaysUseStrafing - the bots will always strafe to that point. bBlocked - used by the engine to show a bot that this path is blocked by another bot right now. bMakeSourceOnly - when rebuilding the paths, then no paths will lead TOWARDS this point, but still from it. bNeverUseStrafing - the bots will never strafe to this point. bNoSuperSize - hack for the Levi. It makes the Levi-driver believe, that the this point is too small for the Levi, although it would fit actually. bOneWayPath - bots use the path only in the indicated direction. You have to enable "bDirectional" in the "Advanced"-section to get an arrow to rotate the PathNode. bPropagatesSound - don't know if this has any effect at all. bVehicleDestination - use a RoadPathNode for this to keep the overview with the paths. ExtraCost - enter a positive value to make this point less attractive for bots, because they think during their calculation that it's more far away, so they might think about to use another path to get to their goal. Enter a negative value to make it more attractive for them. Be careful with this, it might screw up the botplay. A positive value of 10000 is the same as "bBlocked". ProscribedPaths - forbid a bot to go from this point to the point you entered here.
|
| jancsi33 • PM |
Sep 24, 2009 12:41 PM
|
|
Jancsi.:LLS:.
Posts: 217 |
Ok, thank you
crusha_k_rool wrote: Okay, sorry, I won't post here further on this week. |
| crusha_k_rool • PM |
Sep 24, 2009 2:12 PM
|
|
[GSPB]Crusha
Posts: 926 |
It's no problem, at the weekend I might have some time. Don't feel like you bother me, I maybe just won't reply immediately.
You could take a look at what I have posted here: http://forum.omnipotents.com/showthread.php?t=12500 These are some things that I really miss in many maps. It seems like only a few people really now about all of that stuff, so please try to keep some of them in mind.
|
|
GAMETRACKER
Servers Teams Profiles Games |
QUICK LINKS
Members Area Search Report a Bug Forums |
SPONSORS
Cheap Ventrilo Hosting Rent Game Servers |
LEGAL
Terms of Service | Privacy Policy Use Policy | Anti-spam Policy Cookie Policy | GDPR Privacy Notice |
|
|
|
||||