


| crusha_k_rool • PM |
Oct 27, 2009 4:27 PM
|
|
[GSPB]Crusha
Posts: 926 |
To be more exact: That's the surface, that has a "Fake Backdrop"-flag in it's surface properties (F5, or right-click on the surface).
Those surfaces are replaced with the view into the skybox to simulate something that is very far away. More precise, the location of your SkyZoneInfo-actor in the skybox determines what you see, it's the spot of your panorama-camera. The position of the ZoneInfo in your map changes only very few about the position. The texture is just for better distinguishing, you could use every texture you want (but it shouldn't be translucent). The fancy sky-texture as well as a ZonePortal-texture can be found in the package wm_textures.utx 
|
| jancsi33 • PM |
Nov 07, 2009 1:32 PM
|
|
Jancsi.:LLS:.
Posts: 217 |
Can you please teach me Terrain: <--------|
-How to make it <----------------------------This is one sentence  -How to form it <------------------------------| ? <-----------------------------------------------| Or maybe some other time?
Last edited by: jancsi33 Nov 07, 2009 1:34 PM
|
| crusha_k_rool • PM |
Nov 07, 2009 2:29 PM
|
|
[GSPB]Crusha
Posts: 926 |
Damn, I was writing a tutorial and when I wanted to post it, then my cookie for the forum had expired, so I lost the data.
 Anyways, you can learn it much better from the great Unreal Developer Network: http://udn.epicgames.com/Two/TerrainTutorial.html Take a look at all the links there, it's actually the best way how to describe the process of making terrain. You could also create a greyscale-bitmap with a graphic-program of your choice or use the Terrain-Generator mentioned there to have something with that you can start working, when you have no concrete ideas about how your map should look like.
|
| jancsi33 • PM |
Nov 07, 2009 3:20 PM
|
|
Jancsi.:LLS:.
Posts: 217 |
crusha_k_rool wrote: Aww stupid cookie wasted your time...crusha_k_rool wrote: What is a greyscale-bitmap? O.o
Last edited by: jancsi33 Nov 07, 2009 3:22 PM
|
| crusha_k_rool • PM |
Nov 07, 2009 4:02 PM
|
|
[GSPB]Crusha
Posts: 926 |
jancsi33 wrote: This: 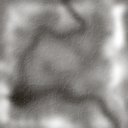 It would result in this: 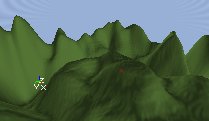 This texture represents the height of the terrain, completely black equals 0 and is the lowest possible point for terrain. White is the highest and equals a value of 2^16. When creating a new terrain such a heightmap is automatically generated to store the information of your terrain. It's value is 0.5 * 2^16 at every pixel by default, right in the middle of the two extremes. You then can edit this heightmap by using the Terrain-Tools and "paint" on the 3D-view of your terrain. The tools work differently depending on whether the TerrainInfo or a layer (texture) of the terrain is selected. For each layer is also a greyscale-bitmap saved in myLevel. For the layers it describes the opacity of a texture on the terrain at a point. White = full opaque; black = full translucent. The texture that is at the top of the layer list is the first one to be drawn, the next down in the list is drawn over it. If it's not 100% white, then you can see the texture under it. If it's fully opaque, then the engine is clever and won't render the texture under it, so there's no need to make the texture below completely translucent. Same goes for Deco-Layers, they describe position and density of the decoration. Work a bit with the terrain and take a look at myLevel then to see the effects, then you probably understand it easier. Other examples of greyscale-bitmaps: http://udn.epicgames.com/Two/CreatingTerrain.html#The%20_TerrainMap And such could be created in programs like GIMP, so you could make a terrain there easily only by drawing it. A result could be something like this, although it wouldn't be very playable probably: http://img.unrealed.de/woolfxxximage1345.gif
|
| jancsi33 • PM |
Nov 08, 2009 4:43 AM
|
|
Jancsi.:LLS:.
Posts: 217 |
Thank you again
 By the way I was a bit noobish because I didn't really know to make it first in the beginning, but then I made terrain with a texture what looked like a black floortile... because I didn't find any grass/mud/etc what's RGBA8 (only those kind of textures can be applied to a terrain) and it's 64x64 and not grass Also, I'm bad at finding a specific texture what I want... So when I'll make that DM map, maybe I'll paste some things... PS: I decided to learn the basic UED InterFace on that page. Nice page btw, though I can't learn everything only with it I need also your help.
Last edited by: jancsi33 Nov 08, 2009 4:55 AM
|
| crusha_k_rool • PM |
Nov 08, 2009 5:08 AM
|
|
[GSPB]Crusha
Posts: 926 |
I just took a look at a map with terrain. Yeah, the layers have the caption "RGBA8", but the textures themselves seem to be DXT, so there shouldn't be a problem, just try them.
If you want to find a specific kind of texture quickly, then you can take a look at this (incomplete) chart: http://wiki.beyondunreal.com/Legacy:Texture_Package You can also get the extern program UTXGaffer to take a look inside the texture packages without loading them all uncomfortable in the editor: http://translate.google.de/translate?prev=hp&hl=de&js=y&u=http%3A%2F%2Fwww.utzone.de%2Finclude.php%3Fpath%3Dcontent%2Fdownload.php%26contentid%3D4388&sl=de&tl=en&history_state0= The download-button is in the top right of the describing window. EDIT: Damn smiley... quote me to see the link.
Last edited by: crusha_k_rool Nov 08, 2009 5:08 AM
|
| jancsi33 • PM |
Nov 08, 2009 6:03 AM
|
|
Jancsi.:LLS:.
Posts: 217 |
Wow, nice program thanks!
|
| jancsi33 • PM |
Jan 15, 2010 1:43 PM
|
|
Jancsi.:LLS:.
Posts: 217 |
-Triggers and moving objects (movers)
Not urgent, don't post if you don't have time! |
| crusha_k_rool • PM |
Jan 15, 2010 3:59 PM
|
|
[GSPB]Crusha
Posts: 926 |
There are different types of Triggers.
The most common is the normal Trigger, which can be set to accept only certain things to trigger it, like projectiles, players, or only a special class. You could for example make a Trigger that can only be activated by a Tank. You find a description of the different variables here: http://wiki.beyondunreal.com/Legacy:Trigger One thing that is not very obvious to think about but quite useful, is the Initial State. States are blocks of UScript-code which allow the same function to work completely different in a state from how it would work in another, so you need only one class for many different ways to work with. The States handle here whether your Trigger can be turned on and / or off by other Triggers. The most important is how to use it actually. In the Collision-group of the properties you can define the CollisionRadius in which the Trigger detects the things that trigger it. You then need the Events-group of the Trigger and of the target that you want to be triggered. The system is pretty simple: When certain conditions are fulfilled, then certain actors can fire "Events" that trigger all actors that have a "Tag" matching this Event-name. So for your Trigger just enter "TestA" in the "Event"-field. Now the Mover: Creating one is pretty simple: Just select a StaticMesh in the StaticMeshBrowser. Then click on  to add it as a Mover in the map. It will be purple, while a StaticMesh would be green-blue. to add it as a Mover in the map. It will be purple, while a StaticMesh would be green-blue.Take in mind, that you can also add ClientMovers by right-clicking on that Mover-button. A ClientMover will save server-resources as it will be handled completely clientside. That means that a ClientMover can't collide or block anything because the clients would have different informations about the location of the mover then. So they are only used for decorative purpose. Like that moving cage on the wall in ONS-Ahebban. Best is to just put them into a BlockingVolume that blocks everything. You could for example use them in an alcove in a wall as gear wheels. Back to the Movers in general. Once it is placed you need to specify the keyframes where the Mover should move along. So first move it in it's first position, the start. Now right-click on the Mover. In this box go to Mover.  Click on Key 0(Base). This is now the first location. Now click on Key 1 and move the Mover to the next position where you want it to stop. If you want one more, then click on Key 2. The Mover will probably jump back to it's initial location, but that's alright. Move it to it's third location. To confirm everything now, click again on Key 0 when your Mover is on it's last keyframe. Now we have to configure it in it's preferences. The most important is the MoveTime. This determines how long the Mover will need from one keyframe to the next one. You can't set different times for different keyframes, that would require a new Mover to be scripted. With NumKeys you set the number of keyframes you acutally want to use. Since we created 3 in this example, you would need to set NumKeys from 2 to 3. You could make a lift this way, but now let's take a door for example, which opens when a player touches a Trigger infront of it: Add the Mover as usual and set it up. We just need 2 keyframes - one closed and one open. Add the Trigger infront of the door. By default the Mover would start to move when it's touched. That's BumpOpenTimed. Now we change it so that the Mover moves when getting triggered. In the preferences go to Object -> InitialState and change it to TriggerOpenTimed. Now the Mover needs an unmistakeable Tag. You should set up the Trigger as described above, then the Trigger has the Event "TestA". Take this name for the Tag of the Mover. The door is done! You can find out more about it's properties here, especially about the states it can be in: http://wiki.beyondunreal.com/Legacy:Mover
Last edited by: crusha_k_rool Jan 15, 2010 4:00 PM
|
|
GAMETRACKER
Servers Teams Profiles Games |
QUICK LINKS
Members Area Search Report a Bug Forums |
SPONSORS
Cheap Ventrilo Hosting Rent Game Servers |
LEGAL
Terms of Service | Privacy Policy Use Policy | Anti-spam Policy Cookie Policy | GDPR Privacy Notice |
|
|
|
||||